We recently engaged Sirocco Systems to design and implement a cloud based data warehouse solution, using the AWS platform for infrastructure and database services. The initial aim was twofold: first to reduce the operational costs of running and maintaining bare metal infrastructure in-house, and second to find a database platform that would be cost and resource flexible based on current and long term analysis requirements. On top of this, having a fully managed service meant reduced operational overhead and it would free up in-house resource for more important tasks. The high level design is documented below:
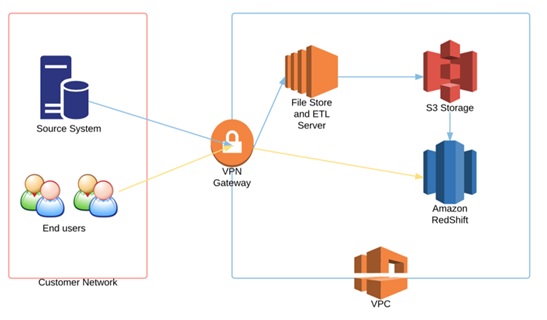
The source system is an Oracle 11.2 database which resides on the office network. The end users of the data warehouse are also based on the office network.
- An EC2 linux instance with EBS storage was used to host the ETL software and act as a file store. In this instance, the ETL tool we used was Oracle Data Integrator.
- S3 storage buckets were used to enable loading data to and from the data warehouse
- A Redshift cluster was used for the data warehouse database engine
- All server and database instances were created inside a VPC, with connectivity to the office network via VPN. VPC allowed us to create a private network in the cloud (in this case acting as an extension of the office network), which could be locked down and isolated away from the public internet as required.
Why Redshift?
Redshift is part of Amazon’s suite of database offerings, and is specifically designed for data warehouse type analysis. It operates as a service (similar to RDS), in that you don’t have access to any of the backend server instances and need only use either the console or in-database commands to manage the database. It is based on Paraccel and PostgreSQL, and uses columnar storage & MPP principles to provide predictable and scalable fast performance.
It’s pricing model is on-demand or by reserved instance, and is set on a per node basis (of which there are several node types, optimized for either performance or capacity depending on your needs). This allows you to provision and pay only for what you need – ie you can start small, and flex up your system as and when necessary.
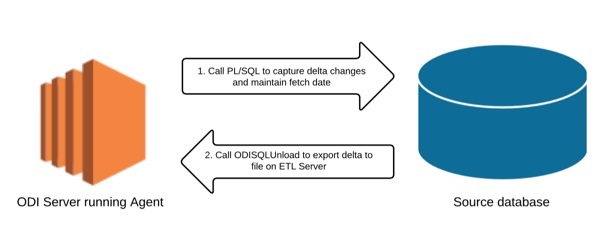
Step 1: Extract data from source
There are several approaches and considerations as to how this is done with Oracle, based on your requirements. We’ll not go into detail here, but if you need to capture changes at a granular level then you’ll want to look into a commercial change data capture technology, of which there are several – Oracle’s Goldengate or Attunity’s Cloudbeam service (which captures changes on your source and propagates them to your redshift cluster) to name two of them.
If granularity is of less importance and your tables have adequate date fields denoting when they were changed, you could also create your own solution using any combination of PL/SQL, shell scripting, python, java etc. In the given solution, we used PL/SQL with some tables to store meta data about the source tables we wanted to capture date based delta changes on, and exposed the code as procedures in ODI. This allowed us to create a package wherein we could call the PL/SQL code from our EC2 instance, and then use the ODISQLUnload utility to write the delta data out to a csv our our filestore.
File preprocessing
Once we have generated our delta file in the filestore, we may want to perform various preprocess activities on, such as cleansing, conversion to UTF8, etc. Amazon also suggest splitting the file up to take advantage of Redshift’s ability to load multiple files in parallel. As a rule of thumb amazon recommend splitting the file based on a multiple of the number of slices in your cluster. You can work out the number of slices by reviewing the information at http://docs.aws.amazon.com/redshift/latest/mgmt/working-with-clusters.html#rs-about-clusters-and-nodes.
We can build a shell script which employs standard unix commands such as iconv and split to carry these actions out for us.
Step 2: Move Data to S3
We now need to get our data into S3, from where we can we load it into our redshift cluster. As with the previous step there are various ways of doing this – For example, you can install and use the AWS client tools, download and install some of the free utilities available on the internet (such as S3tools) or build your own using the SDK. For this solution we used the standard aws client tools. In any case, you will need to first create an S3 bucket, and then either an IAM user or IAM role with policies that allow read/write access to the bucket and any folders beneath them. (See the security section below for an example of an IAM policy set up). The client tools should then be configured with the AWS Access and Secret keys belonging to the IAM user (if that’s what you set up).
We once we have a bucket set up and the tools are configured, we can start transferring the delta files to it. Once again, we can expose the the client calls as procedures in ODI to execute in packages, or likewise create a shell script so that you can archive files off after you’ve uploaded them. The s3 command set has a number of options to allow you to copy files. For example to copy multiple *.csv files in a directory you can use the recursive and include flags:
[s3admin@localhost deltas]$ ls -lt
total 362352
-rw-rw-r– 1 s3admin s3admin 52407000 Sep 18 10:26 PRODUCTS_20150918_8.csv
-rw-rw-r– 1 s3admin s3admin 61111000 Sep 18 10:25 PRODUCTS_20150918_7.csv
-rw-rw-r– 1 s3admin s3admin 55802000 Sep 18 10:25 PRODUCTS_20150918_6.csv
-rw-rw-r– 1 s3admin s3admin 43273000 Sep 18 10:25 PRODUCTS_20150918_5.csv
-rw-rw-r– 1 s3admin s3admin 36762000 Sep 18 10:25 PRODUCTS_20150918_4.csv
-rw-rw-r– 1 s3admin s3admin 38341000 Sep 18 10:25 PRODUCTS_20150918_3.csv
-rw-rw-r– 1 s3admin s3admin 34863000 Sep 18 10:25 PRODUCTS_20150918_2.csv
-rw-rw-r– 1 s3admin s3admin 48473000 Sep 18 10:24 PRODUCTS_20150918_1.csv
-rw-rw-r– 1 s3admin s3admin 48473000 Sep 18 10:24 PRODUCTS_20150918_1.tsv
[s3admin@localhost deltas]$ aws s3 cp . s3://siroccosystems.dw/deltas/PRODUCTS/ –recursive –include “*.csv” –exclude “*.tsv”
upload: ./PRODUCTS_20150918_1.csv to s3://siroccosystems.dw/deltas/PRODUCTS/PRODUCTS_20150918_1.csv
upload: ./PRODUCTS_20150918_3.csv to s3://siroccosystems.dw/deltas/PRODUCTS/PRODUCTS_20150918_3.csv
upload: ./PRODUCTS_20150918_2.csv to s3://siroccosystems.dw/deltas/PRODUCTS/PRODUCTS_20150918_2.csv
upload: ./PRODUCTS_20150918_4.csv to s3://siroccosystems.dw/deltas/PRODUCTS/PRODUCTS_20150918_4.csv
upload: ./PRODUCTS_20150918_6.csv to s3://siroccosystems.dw/deltas/PRODUCTS/PRODUCTS_20150918_6.csv
upload: ./PRODUCTS_20150918_5.csv to s3://siroccosystems.dw/deltas/PRODUCTS/PRODUCTS_20150918_5.csv
upload: ./PRODUCTS_20150918_7.csv to s3://siroccosystems.dw/deltas/PRODUCTS/PRODUCTS_20150918_7.csv
upload: ./PRODUCTS_20150918_8.csv to s3://siroccosystems.dw/deltas/PRODUCTS/PRODUCTS_20150918_8.csv
N.B. Amazon recommend not storing key credentials on any host and using IAM roles instead. It should be noted that IAM roles must be assigned when you launch an EC2 instance, and at the time of writing, cannot be changed later (though you can change the policies attached to the role).
Step 3: Load Data into Redshift
Now that the delta files are in S3, we can use Redshift’s in-database copy command to load the files into a table in our landing schema.
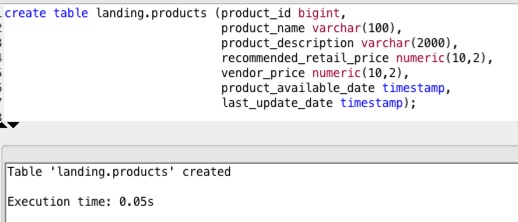
First we create the target table:
We can then issue the following command to load the deltas:
copy landing.products
from ‘s3://siroccosystems.dw/deltas/PRODUCTS/’
credentials ‘aws_access_key_id=<ACCESS KEY>;aws_secret_access_key=<SECRET KEY>’
emptyasnull blanksasnull delimiter as ‘$’;
When the load completes successfully we get the following output:
Warnings:
Load into table ‘products’ completed, 16655240 record(s) loaded successfully.
copy executed successfully
Execution time: 54.52s
In the event that any errors might’ve occurred, we may see see the following output:
An error occurred when executing the SQL command:
copy landing.products
from ‘s3://siroccosystems.dw/deltas/CUSTOMERS/’
credentials …
[Amazon](500310) Invalid operation: Load into table ‘products’ failed. Check ‘stl_load_errors’ system table for details.;
Execution time: 1.98s
1 statement failed.
We can then review the stl_load_errors system table:

(in this example we purposely tried to load the customers delta into the product table).
So now that we have the delta file loaded into our Redshift database, we are able to perform any required transformations to build out and/or update our data warehouse dimensions and facts. AWS provide both an ODBC and JDBC driver (which you can find at http://docs.aws.amazon.com/redshift/latest/mgmt/configure-jdbc-connection.html) and these can be added to your application to allow it to work with Redshift. For example, you can copy it to the ODI Agent lib directory (user_projects/domains/base_domain/lib/) to enable ODI to work with it. In terms of reporting tools, in our experience Tableau works well with Redshift and there is an ODBC driver that enables OBIEE to connect (though you will want to assess which OBIEE features work and which don’t).
Security considerations
Redshift
Security was of paramount importance so the database was built utilising Redshift’s encrypted option, encrypting the data at rest, in the database and in all backups. We haven’t noticed any performance degradation so far but if it does occur we will move to the SSD nodes to increase performance. Redshift encryption works by using a 4 four tier hierarchical key system, and you can use either KMS or HSM for managing the top level keys.
We also used Redshift’s in-database security model to create groups and users, and assigned privileges as and where required, e.g. to allow the Ops/BAU team to read certain log tables but not update/insert/delete. We periodically had some temporary access requirements, so in these instances we created named user accounts and used the valid until clause to lock the accounts after a set period of time.
EC2/EBS/Application
Within the EC2 layer, we restricted access to the server to named users, and used encrypted EBS volumes to secure the data at rest on the filestore. We also implemented In-application security, creating named users and assigning set privileges (e.g. Operator roles to allow the ops team to review execution logs and start/stop certain processes).
S3
As always, there are a few options around this. The first and most straight forward approach is to use S3’s own server side encryption, wherein you let S3 handle the encryption keys. you can store your data in S3 in SSE form by specifying the server side encryption flag when you upload:
aws s3 cp . s3://siroccosystems.dw/deltas/ –recursive –include “*.csv” –sse
upload: deltas/PRICE_20150917_1.csv to s3://siroccosystems.dw/deltas/deltas/PRICE_20150917_1.csv
upload: deltas/PRICE_20150918_1.csv to s3://siroccosystems.dw/deltas/deltas/PRICE_20150918_1.csv
upload: deltas/PRICE_20150918_3.csv to s3://siroccosystems.dw/deltas/deltas/PRICE_20150918_3.csv
upload: deltas/PRICE_20150918_2.csv to s3://siroccosystems.dw/deltas/deltas/PRICE_20150918_2.csv
upload: deltas/PRICE_20150918_4.csv to s3://siroccosystems.dw/deltas/deltas/PRICE_20150918_4.csv
upload: deltas/PRICE_20150918_5.csv to s3://siroccosystems.dw/deltas/deltas/PRICE_20150918_5.csv
upload: deltas/PRICE_20150918_6.csv to s3://siroccosystems.dw/deltas/deltas/PRICE_20150918_6.csv
Now, if we inspect one of those files using the management console we can see this:

Securing your S3 bucket
One of the most important aspects to cover is ensuring access to your S3 bucket is limited to only those that require it. You can do this by creating dedicated IAM roles or users, and creating and attaching appropriate restrictive policies. You should then consider testing access restrictions are correctly in place both by using other IAM users in your account, users from another account and then by the general public.
Here is a brief walk through for an example setup:
Create the bucket either by using the cli as an authorised user or from the AWS console:
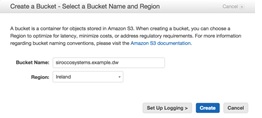
N.B. it’s worth noting when creating buckets that although you can see them at the top level, you may not be able to use them straight away due to DNS propagation. This can take an hour or so to resolve correctly, so don’t be surprised if you receive odd looking errors/permissions within that time.
2) Create a new user in IAM
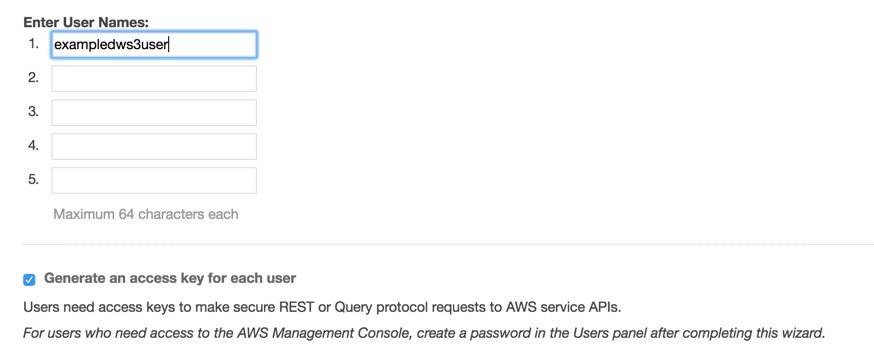
Make a note of the access and secret keys as they are required later for configuring the AWS CLI tools.
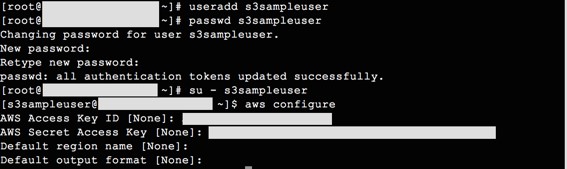
3) On our filestore / host server we create a dedicated unix user account, then after sudo’ing to that user we can configure the aws tools. For the access and secret key, use the credentials you received after creating the examples3user in IAM:
Once configured, we can test our S3 access:
![]()
By default we have no permissions and can’t see anything, so we now need to either attach an appropriate existing IAM policy, or create a custom one for this user.
3) Create and attach the IAM policy
For this example, we want to give our user permissions to list all the existing buckets, but restrict them to full control only on our new bucket and it’s contents. We can do this with the following policy privs:

So in IAM, we can now generate a new policy:
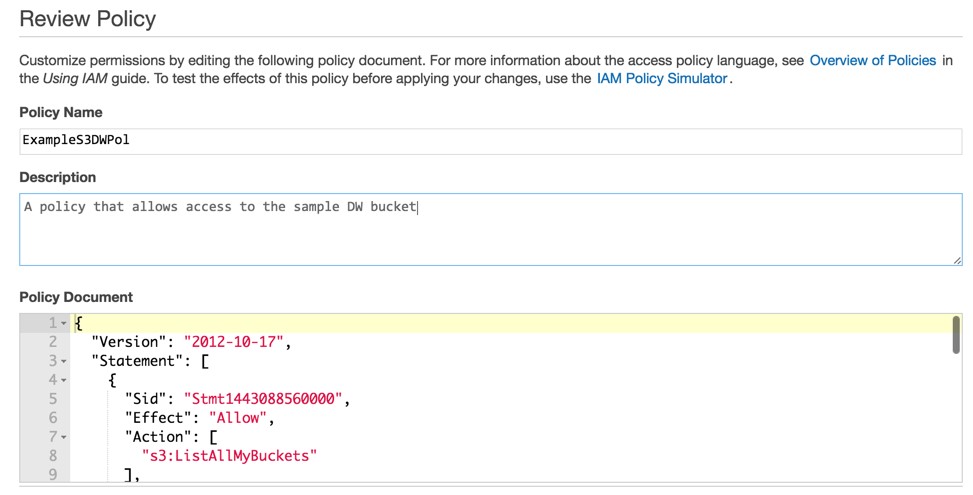
It’s worth clicking the validate button to ensure you have everything set correctly in terms of formatting and syntax, before hitting Create Policy.
Once created, we can then attach this policy to our IAM user:

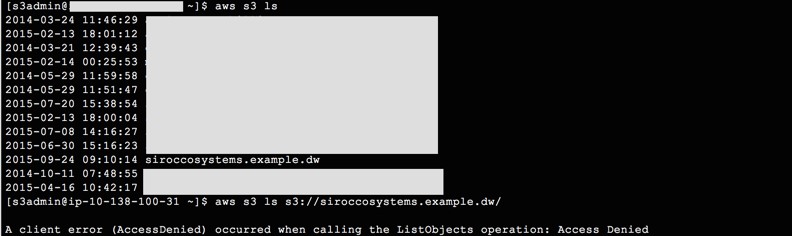
Finally we can test access from our host again:
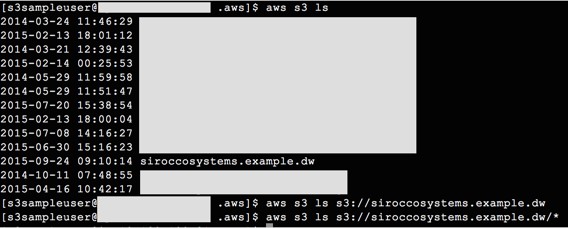
So we can now list all buckets (obscured in the image above) including the one for our user, so we should finally test we can upload files:

Looks good. So let’s just check we can’t see any other bucket’s contents as per our intended restrictions:
![]()
One final test, let’s use another user to see if we can view the contents of our new bucket:
So coupling SSE enabled uploads with IAM policies goes some way to ensuring our data is secured and access controlled at rest.
Conclusion
In terms of getting our data into the AWS cloud, we’ve shown we can do this using basic unix tools and the AWS CLI, all the while ensuring that our data is stored safely and access restricted at all layers. This approach is nice because you can leverage existing unix and application / ETL skills. In our next set of blogs, we’ll look at using some of the AWS technologies such as SWF to orchestrate and co-ordinate your etl jobs, as well as taking a look at performance considerations inside Redshift itself.